June 06, 2024

WHAT IS A REVIT TEMPLATE AND WHY DO I NEED ONE?


WHAT IS A REVIT TEMPLATE?

If you are familiar with drafting but not Revit specifically, you may be thinking “What IS a Revit template?” 


A Revit template is your starting point for new projects in Revit. You can think of a Revit template as a predefined setup that includes all the necessary components, settings, and standards to streamline the creation of architectural drawings and models. 


Predefined settings and ready-to-use elements in a customized template save significant time. Architects and designers do not need to set up project parameters, annotations, view templates, and sheets from scratch for each new project. This reduces the setup time and allows the team to focus on design and development rather than redundant administrative tasks.


A customized Revit template is a strategic asset for an architecture firm. It promotes consistency, efficiency, quality control, and collaboration, ultimately leading to better project outcomes and higher client satisfaction. Investing in a well-developed Revit template is a step towards optimizing workflows and maintaining a competitive edge in the industry


WHY DO I NEED A REVIT TEMPLATE? 


Every architecture firm has unique workflows, standards, and preferences. A customized Revit template can include firm-specific families, annotations, title blocks, and schedules that align with the firm’s unique requirements, enhancing the overall workflow and project delivery.


Benefits of Using a Revit Template:

  • Consistency: Just as using a standard set of drawing conventions ensures all your drafting work looks consistent, a Revit template ensures that every project maintains a uniform appearance and adheres to your firm’s standards. It also makes it easier for everyone in the firm to understand and work on each other’s projects.

  • Efficiency: With all the basic settings, common elements, and organizational structures pre-configured, you can start new projects more quickly without having to set everything up from scratch. 

  • Quality Control: By embedding best practices and standardized elements into the template, you reduce the chance of errors and ensure higher quality outputs.

  • Branding: Helps maintain uniformity in project documentation and the branding of the firm, creating a visual language across all of the output from your firm.

  • Streamlined Training: New employees can be trained more efficiently with a standardized template. They can quickly become familiar with the firm’s processes and standards, reducing the learning curve and making them productive faster.


WHAT ARE THE KEY COMPONENTS OF A REVIT TEMPLATE?

Key Components of a Revit Template:

  1. Predefined Views:
    • View Settings: Includes predefined settings for how different views (like floor plans, elevations, sections, and 3D views) should look. This is similar to having a standard way of drawing different types of views in drafting.
    • Line Styles and Weights: Defines how different elements (walls, doors, windows, etc.) should appear in terms of line thickness, color, and style, ensuring consistency across all drawings.
    • Object Styles: Object styles define how elements are shown graphically throughout the project when not using a specified view template.
  2. Commonly Used Elements
    • Families: In Revit, families are reusable components (like blocks in CAD) that include everything from furniture and fixtures to structural elements. A template includes a library of these families, ready for use.
    • Annotations: Predefined text styles, dimensions, tags, and other annotation tools that help ensure all project documents look uniform and consistent throughout all projects.
  3. Project Organization
    • Levels and Grids: Predefined levels (floor heights) and grids (reference lines) help set up the framework of the site and building.
    • Sheets and Title Blocks: Ready-to-use sheet layouts with title blocks that include the firm’s branding and standard information fields.
  4. Schedules and Legends
    • Schedules: Automated tables that list building components (like door schedules, window schedules, etc.).
    • Legends: Predefined legends that explain symbols, materials, or other conventions used in the drawings.
  5. Phases
    • Phases: Templates can be set up with predefined phases (like existing, demolition, and new construction) to manage projects that evolve over time.


SUMMARY

A Revit template is a powerful tool that helps streamline the setup process for new projects. Using a custom, standardized setup that helps you start new projects efficiently and maintain consistency and quality across all your CAD modeling, drafting, and documentation. 


May 30, 2024

PROCEDURAL MODELING - SCALABLE FAMILY IN REVIT


SUMMARY

Sometimes you just need to scale a family in Revit. But because it is a BIM program, this is not a simply available tool. Here is a tutorial that shows you how to create a work around to serve that purpose.  


TUTORIAL


Here is the direct link.  If you have any questions, leave a comment on the video or here.  Let me know if there are any other tutorials you would like to see in the future!


May 29, 2024

CARPINTERIA NEWS: PARKLETS LEASED BY THE CITY


WHAT ARE PARKLETS?


Parklets are a small public gathering space used as an extension of dining space of a nearby restaurant or food service establishment. They may also be used for public or private seating, bicycle parking, or other sidewalk type uses.


These parklets started popping up during in 2020 to meet the needs at the time and have stayed after showing a positive impact in some areas. The City of Carpinteria has seen a positive impact and is incentivizing restaurant owners to participate with a parklet leasing program.


SUMMARY

The City of Carpinteria has a parklet leasing program. Restaurants in the Downtown "T" area that meet the criteria will be able to lease a parklet for $68 a month. The restaurant can customize their parklet based on the options provided by the pre-approved manufacturer. In order to lease the parklet, the restaurant owner will have to submit an application to the city by July 1, 2024.


CRITERIA

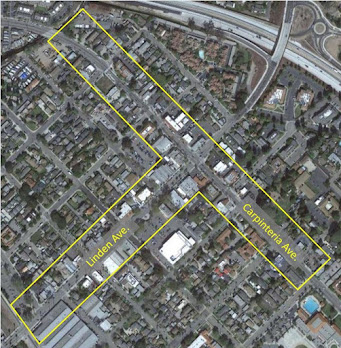
Restaurants located within the Downtown "T" (see image below) in Carpinteria will be able to take advantage of this program. The restaurant must be defined as a restaurant per Section 8.08.820 of the Carpinteria Municipal Code. The restaurant must show proof of insurance.


In addition to being located in the Downtown "T", the proposed parklet needs to be located directly in front of the restaurant.  If a restaurant has two dedicated parking spots, the parklet can take the space of both of them. 


PERMIT & LEASE

The initial term of the permit is 5 years and will need to be renewed yearly after that. The permit application fee is $435 and the monthly lease is $68. The permit and plans for the monthly leased parklets can be prepared by an unlicensed designer. Custom parklets need to be prepared by a licensed professional. The permit application needs to be accompanied by a detailed site plan with required information and images of the selected materials.


In addition to the parklet infrastructure, items that can be included but are not required in the permit are: furnishings, landscaping, heating, lighting, and bicycle parking. Heating elements will require an additional permit and approval by the Fire District and by Public Works.


The restaurant will need to show proof of insurance as well. Alcohol service in the public Right-of-Way must be approved by the City and the Ca A.B.C.


HOW TO GET STARTED

Between now and June 30, Unlocked Designs is offering a parklet permitting package to restaurants that fit the criteria for these leased parklets. For a flat fee, Unlocked Designs will help you pick out the right parklet for your style, prepare the permit application and supporting documents, and coordinate with the City of Carpinteria to obtain your permit. Contact Unlocked Designs to get started by visiting our website and booking a free 30 minute introduction call or emailing us at UnlockedDesignsShop@gmail.com.


December 17, 2023

PROCEDURAL MODELING - CABINETS


SUMMARY

Procedural modeling is a great way to simplify parametric models.  If you plan on using the same type of asset more than once, a procedural model can be very useful.  If you are a Revit user coming to Blender, you will see a similarity between dynamic Families and Procedural Models, and converting your families to procedural models can be a great way to improve your Blender and procedural modeling skills. Cabinets are a great place to start.  


This tutorial will explain the overall ideas behind building a procedural cabinet in Blender and give an example of each type of node group.  The asset can be found here on Gumroad and an in depth video tutorial is coming soon.  


WHAT IS A PROCEDURAL ASSET

A procedural asset uses an algorithm to create a 3d model, texture, or material.  In Blender, this is done using a node based workflow called Geometry Nodes.  With a procedural asset, the geometry of an object can be altered nondestructively.  


VISUALIZE IT

Before building your asset, it can be helpful to create a road map towards your goal.  This can be done many ways, with a drawing, with a flow chart, whatever helps you visualize it.  I like to create a rough version of the model in a drawing and define each segment with a simple place holder.  Once each placeholder is created, they are more defined until the outcome is what I was looking for.  


PIECES OF THE MODEL

Assets are often made up of more than one object. These can be built in the same model or nested as a family, instance, block, function, etc… depending on the program you are using.  In this tutorial, some objects will be built using node groups, and some will be an instance.  The main segments of the cabinet will be:

  • The casework

  • The drawers 


These two segments do use some of the same properties but are created differently, so separating them into two processes simplifies it.  Each of these segments will contain objects that come together to create the finished asset.  

  • The casework

    • Bottom

    • Top

    • Sides

    • Toe Kick

  • The drawers 

    • Drawers 

    • Dividers

    • Handles


MODEL PROPERTIES

Now that we have the pieces of the model defined, we can figure out which properties will also need to be defined to build those pieces. Some of these will be user defined, and some will be constant.  In Blender, the user defined properties are called Inputs in geometry nodes.  Here are the user defined inputs for this cabinet model.


  • Cabinet Height [h]

  • Cabinet Width [w]

  • Cabinet Depth [d] 

  • Cabinet Side Thickness [th]

  • Drawer Quantity [N]

  • Toe Kick Height [h_toe]

  • Handle Width [w_handle]

  • Material


There will also be other properties used to create the model, but they will be defined within the nodes.  These will be


  • Toe Kick Inset

  • Divider Height

  • Casework Height

  • Drawer Height

  • Top Plate Height

  • Toe Kick Y

  • Toe Kick Z_mid


These are defined with user defined properties, constants, and math nodes.  


NODE GROUPS

The inputs and parameters are then linked into two distinct node groups, the cabinet body and the drawer segments. This image shows the model and the nodes that created it. The inputs are used to define the variables and then both the inputs and those variables are used to define the geometry.


These node groups define the cabinet as two segments later joined.  


MAKING THE CABINET

The casework is made up of a bottom, a top, sides, and a toe kick.  Each of these segments is defined in a node group.


Each of these segments is a cube placed as an instance on a point.  They all use the appropriate dimensions, but are created very similarly.  Here is the top plate node group expanded


The drawer segment is made up of drawers, dividers, and handles, and those instances are repeated in an array based on the user-defined Number of Drawers [N]. 


The mesh line allows you to define a start and end point for a line and how many points are along that line.  This requires two mesh lines.  One that defines the array for the drawers and handles, and one that defines the array for the drawer dividers.  To make this easier, the drawers and handles are in one node group, and the dividers are in the other.  


The drawers and handles can be modeled using geometry nodes, as shown, or other pre-made assets can be used as the instances for these parts of the model.  


The dividers are simple instances distributed on the points of the mesh line. 


PUT IT ALL TOGETHER

Once each piece has been defined, the Join Geometry node will be used to put it together.  In this asset, there is also a set material node.  Each piece can be individually fine tuned for the level of detail required.  While it may look complicated, it only uses a handful of nodes to create the cabinet.  


Search This Blog

WHAT IS A REVIT TEMPLATE AND WHY DO I NEED ONE?

WHAT IS A REVIT TEMPLATE? If you are familiar with drafting but not Revit specifically, you may be thinking “What IS a Revit template?”  A R...